Showing posts with label flourish. Show all posts

Sunday, May 5, 2013

Age as Art


A little commission for a fiftieth birthday card: Youth is the gift of nature, but age is a work of art. ~ Stanislaw Lec. 


I need to have this etched on my bathroom mirror!

Monday, December 24, 2012

Joy to the World!


This project took quite a while to gel, but yesterday it finally came together! I started several weeks ago with an actual scale diagram, taking in to account the television, the cabinet, two framed pieces of art, and even the beam. Oh, the obstacles we face as artists...


The script-y words took a different form--couldn't quite pull off the ribbon look. Of course, with chalk one can keep "fixing" things forever... Unlike the signboards for the school, this is real chalk (not Zig Posterman); my guests tend to be better behaved than the preschoolers. It also doesn't rain inside my house.


My husband kept telling me to add color to the "illuminated" R, but I was curious how far it could go with just black and white. What do you think?


Happy holidays to all, and keep looking for the joy!

Thursday, October 25, 2012

To Have and to Hold


Bleedproof white lettering,  23 kt gold leaf dots, approx. 9" X 12"
Fourteen years ago we welcomed an exchange student from Germany into our family for a year.  It was in every way a wonderful experience, and we have managed to stay in touch across busy lives.  I had always promised my "German daughter" I would be there when she married, and last weekend, I was!  Here's the beautiful bride just before the fairy-tale wedding on the grounds of a historic castle.


But wait, there's more!  I'm somebody adorable's "American grandma"!


My two grown-up "babies" went along and I loved every minute.  It was a happy, happy occasion.


Thursday, July 19, 2012

Summer Fun in the Family Room

"The Perfect is the enemy of the Good."  ~Voltaire
Much to the amusement of friends and family, I've been at it again, scribbling on the walls!  This quote had been rattling around in my brain for a while, and seemed a propos after coming away somewhat intimidated by the hundreds of more-accomplished calligraphers at Calligraphy Northwest last month.  Not that those inspirational folks are the enemy, mind you--I am perfectly capable of taking on that role for myself--but for me, it's an important reminder that just plain "good" is something to feel, well, good about.

I thought I'd share a bit of process this time.  I started with a little doodle on a graph-paper sticky note;  as usual, television = design challenge.


Although the finished project is done with dime store chalk, for some reason it was hard for me to get started with such a blunt tip.  Enter two handy tools, both marketed primarily to quilters:


The Fons & Porter is ultra-fine chalk--about the size of pencil lead--and happens to be sold by Paper & Ink Arts for lining dark envelopes.  The bolder "pen" is made by Dritz and I picked it up at Joann Fabrics.  It comes with a little box of white and colored "leads"! Joy!

I started out sketching with the Fons & Porter...


Then defined lines a little more with the chalk pen:


Gradually I filled in and tweaked:


As you can see, there's still some clean-up to do, but I kind of like the chalkiness of it all.  By the way, this wall is painted with plain old latex (hadn't actually planned to be writing on it back then), which is getting a bit trashed by all this foolery.  My "buddy" Martha has a recipe for homemade chalkboard paint, and some great ideas for using it, here.  Check it out!

Monday, November 28, 2011

The Saga Continues

One of the highlights of October was my third visit to Geneva-on-the-Lake, Ohio for the Spencerian Saga.  The sunset over Lake Erie the first night could not have been more welcoming.


This year it was the Engrossers' Saga--a once-every-five-year occurrence--and the 25th anniversary of the annual workshop.  I've already said plenty about the Saga here, but this one seemed to bring together a lot of things I had been dabbling with and helped me see how I could put them to use in a cohesive piece.  Stay tuned for that one...

From Ohio I went to meet my sister at my beloved Findley Lake, New York, to stay at the Blue Heron Inn bed-and-breakfast...in the Lakeview Room, of course!


I decided to put some of my new-found skills to work as I signed the guestbook.  Maybe no one will ever see it, but I love knowing that it's there!


Back home, while messing around on the internet I discovered that my son had been named "Mr. November" at his college back East.  Not sure what that's all about, but used it to adorn the 3 X 5 card that will be enclosed with his exam-week care package:


Onward to December...!

Monday, April 4, 2011

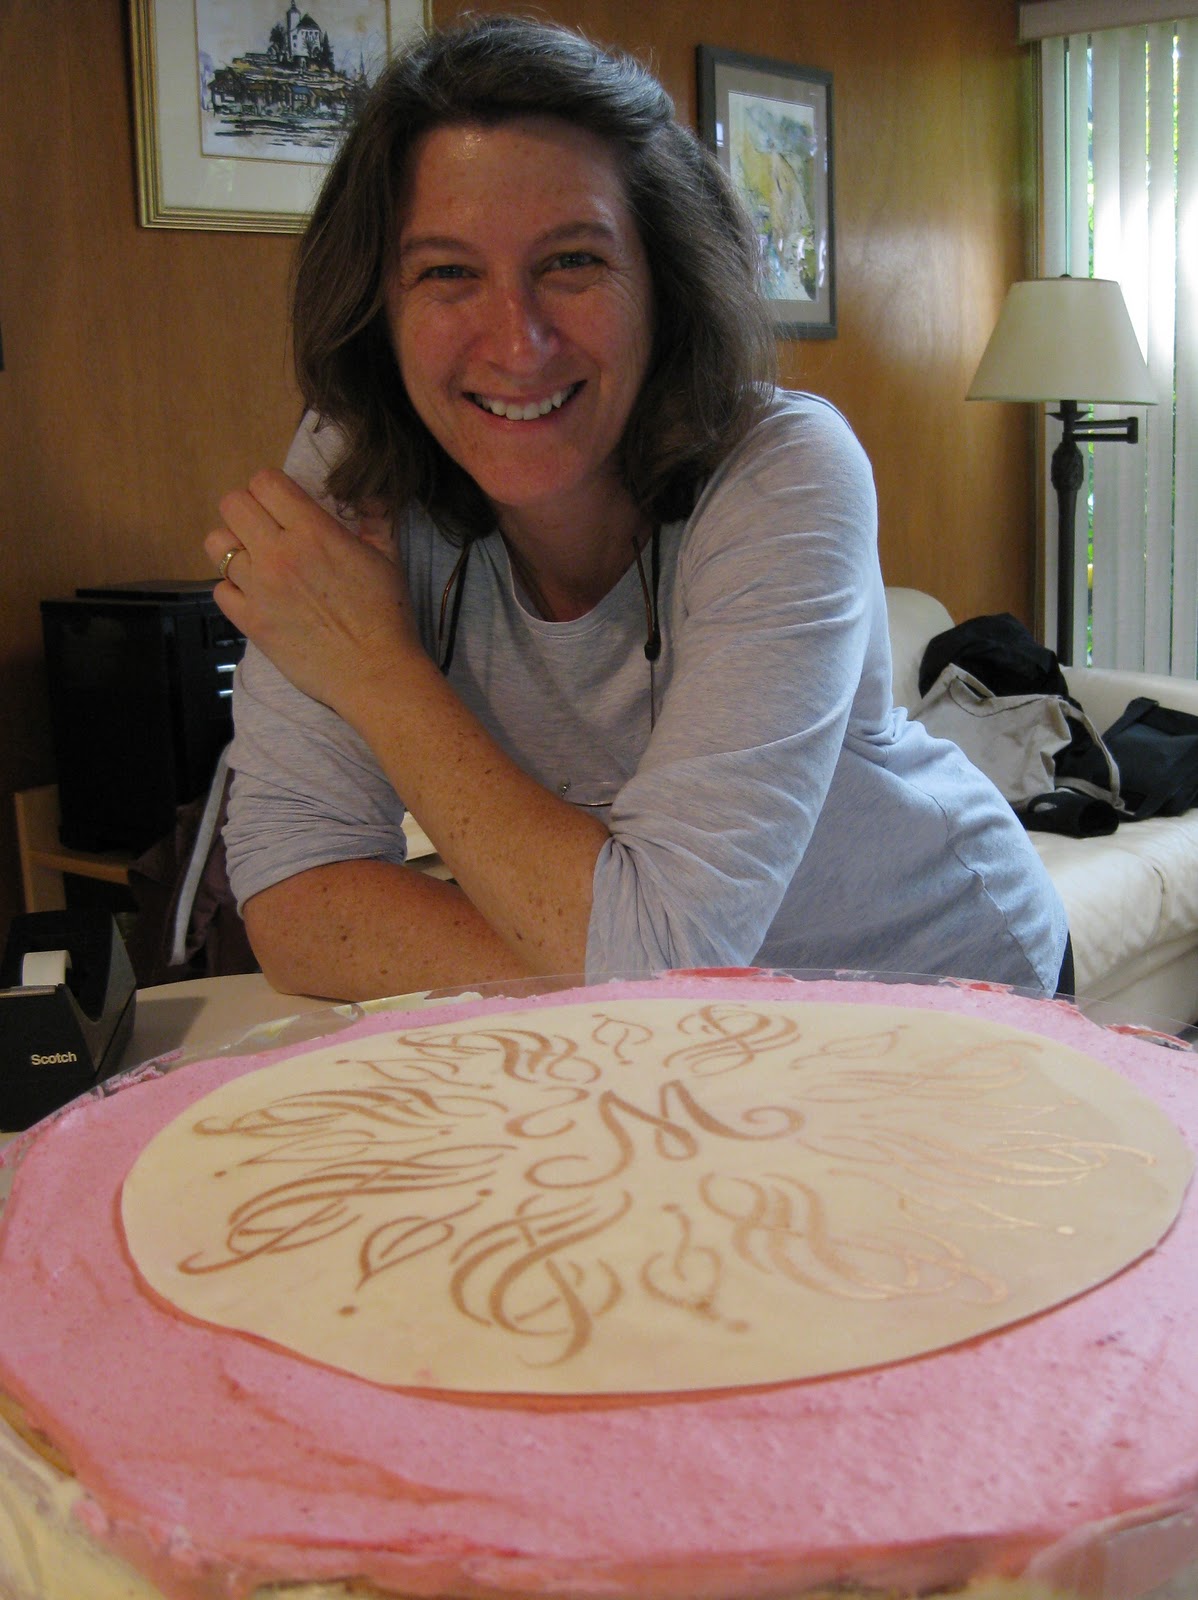
More Calligraphed Confections: Marian's Cake


Wendy and I so much enjoyed making the "K" mandala cake that we decided to do it again, this time for my friend Marian,  a self-professed diva who is turning 75.  My idea was to work a stylized treble clef into the design because she is, after all, a soprano--but treble clefs are so, I don't know, ordinary.  There was a lot of trial and error involved, so I worked in pencil on this one.


This time I cheated a little bit and when I finally got the motif right I just made seven copies and pasted it up.  I added the leaves freehand for some finer contrast.  The dots were punched from black paper and glued, making much better circles than I could have done by hand.  Again I taped the design to the table, placed a piece of glass over it and then the stencil blank over that.  With my handy "burner" tool I cut the stencil in no time at all.  Then I headed over to Wendy's to test it with "old gold" lustre dust on parchment paper.


Wendy decided we should do the sides of the cake as well (a 14" creation!) and sent me home to make that stencil.  Again, I copied, cut and pasted using elements of the round top design.


By the time I got back to her house, she had applied the gold to the top of the cake, a perfect disk of white chocolate.


Just imagine:  layers of almond-flavored cake alternating with layers of raspberry mousse and lemon cloud illusion (lemon cream made with lemon curd).  To die for!  We stenciled the sides on two slabs of homemade marzipan (Wendy skinned the almonds herself!).  It was a more subtle look than on the white chocolate, probably because of the moisture element.


Here's the first half applied:


And here's the master pastry chef herself:


Back into my studio I set to work making a matching card for Marian with my trusty Zebra G nib in Aztec Gold Finetec on Opal Stardust cardstock and envelope.


By the time I picked up the cake the next day for the party, Wendy had worked her magic with piping, fresh raspberries and marzipan leaves.


At the party, the beautiful birthday diva serenaded us with her amazing voice (and we serenaded her back with "Happy Birthday")...


...candles were added for "past, present and future"...


...and then it was time for cake!


Wendy and I are having so much fun with this collaboration!  Stay tuned for the letter "T"!

Sunday, March 20, 2011

Let Them Eat Cake!: Karen's Cake


I had already asked my dear neighbor Wendy Remer, an amazing chocolatier, to make a cake for my friend's 50th birthday celebration.  Then we saw the latest issue of Martha Stewart Weddings...


...and were inspired by the wonderful creations of Nan Deluca, Patricia Mumau, Dana Cochran, and Xandra Zamora. We decided to collaborate and create something unique for the occasion.

Having admired the work, and especially the mandalas, of Jane Farr, I was delighted to find her outstanding step-by-step instructions for creating them.  I penned my first mandala around the initial "K", then headed to Fedex Kinko's (or whatever it's called this week) to make a few enlargements.

With luck (and a 40% off coupon) I found an electric stencil cutter at Michaels--I didn't even know such a thing existed!  What a dream to work with!  It's kind of like a woodburning tool with a very fine tip.  It seems to work well on .003 and thicker acetate sheets, as well as the stencil blanks that are sold for this purpose.


I taped the design to my work table, then a piece of glass over that, and the blank stencil on top.  With a little practice I was able to keep the tool moving smoothly enough.  (I did have my husband improve the insulation, though--it gets very hot!).


The pieces popped out easily with a craft knife.


I set the stencil over a piece of black paper to make sure I hadn't missed any sections...


...and on a whim, took out my pan chalks and a cotton ball to give it a test run.


Then it was time to head over to Wendy's for further experimentation!  She had seen a video on using stencils with royal icing, which specified that the icing should be the consistency of mayonnaise.  She tried out the stencil on her Silpat mat with mayonnaise and pink food coloring.  Voila!


Encouraged by success, I cut and pasted elements of the mandala for a stencil to use on the sides of the cake.  We ended up not using it after all.


Though next time we'd make it a bit stiffer, the apricot-tinted royal icing was quite striking over the chocolate fondant, and Wendy added some touches of gold dust to dress it up a bit.  I made a little matching card to go with it (but forgot to take a picture of it).


The Birthday Girl was glowing and gorgeous!

LinkWithin

Related Posts with Thumbnails